Unlock the secrets of hidden passages by learning how to build your very own secret door. Whether you’re looking to add an element of mystery to your home or create a fun and imaginative play space, constructing a secret door can be a rewarding and exciting project.
A secret door is not only fun to build and use, but has practical purposes to hide unseemly areas such as:
- Hidden toilet door
- Hidden attic door
- Hidden laundry doors
- Hidden pantry doors
You can also use it to hide a home safe and other valuables. Some people have a safe room in their house and use a secret door to hide its location. There are an unlimited number of uses for a well-built secret door.
In this guide, we’ll take you through the step-by-step process of building a secret door, from planning and design to installation and finishing touches. Get ready to transform an ordinary doorway into a hidden portal to a world of intrigue.
Planning and Design
When planning the installation of a secret door, one of the most crucial considerations is selecting the perfect location. Consider the purpose of the hidden passage and the functionality you desire. Is it meant to serve as a discreet entrance to a private study or a hidden playroom for children? Assess the accessibility and privacy of potential locations within your home.
Consider the overall layout and flow of the space as well. Ideally, the secret door should seamlessly blend into the surroundings and not raise suspicion. Look for areas that have sufficient space for the door to swing open without obstruction. It’s essential that the chosen location allows for a natural transition between the hidden area and the adjacent rooms. Make sure the space fits into the overall layout around the rest of the area. For example, if you make a closet into a secret room, don’t spread the walls on either side too far apart. A keen observer might be able to figure out that the spacing in the connecting rooms is off, leaving unaccounted for space and revealing your secret room.
Determining the Type of Secret Door
Once you have selected the location, the next step is to determine the type of secret door that best suits your needs and preferences. There are several popular options to choose from, each with its unique charm and functionality.
- Bookcase Doors: Hidden bookcase doors are a classic choice for concealing a secret passage. These doors blend seamlessly with surrounding bookshelves and open when a specific book or mechanism is activated. They add an air of mystery and sophistication to any space. However, one consideration is that bookshelf doors can be very heavy, especially when loaded down with books. You will need to take this into account as you design the door.
- Panel Doors: Panel doors provide a more discreet approach to hidden entrances. These doors are designed to look like regular wall panels, seamlessly integrating into the room’s architecture. They open with a hidden latch or lever, revealing the hidden passage behind. The key to making a panel secret door is covering the reveal line. This is the edge of the door that reveals its location. To cover these lines, you typically use trim or molding. This will require that the door opens in to allow your hinges to work or use a wrap-around hinge that will open out and around molding or trim.
- Mirror Doors: Mirror doors serve a dual purpose, functioning as both a hidden entrance and a practical reflective surface. These doors feature a mirror on the front, making them blend effortlessly with the room’s decor. When opened, they reveal the hidden passageway beyond. This might work well in a bedroom by dividing your closet and make one half into a secret space and the other into a functional closet. It would be difficult to spot and give you a place to have a home safe or other hidden closet space.
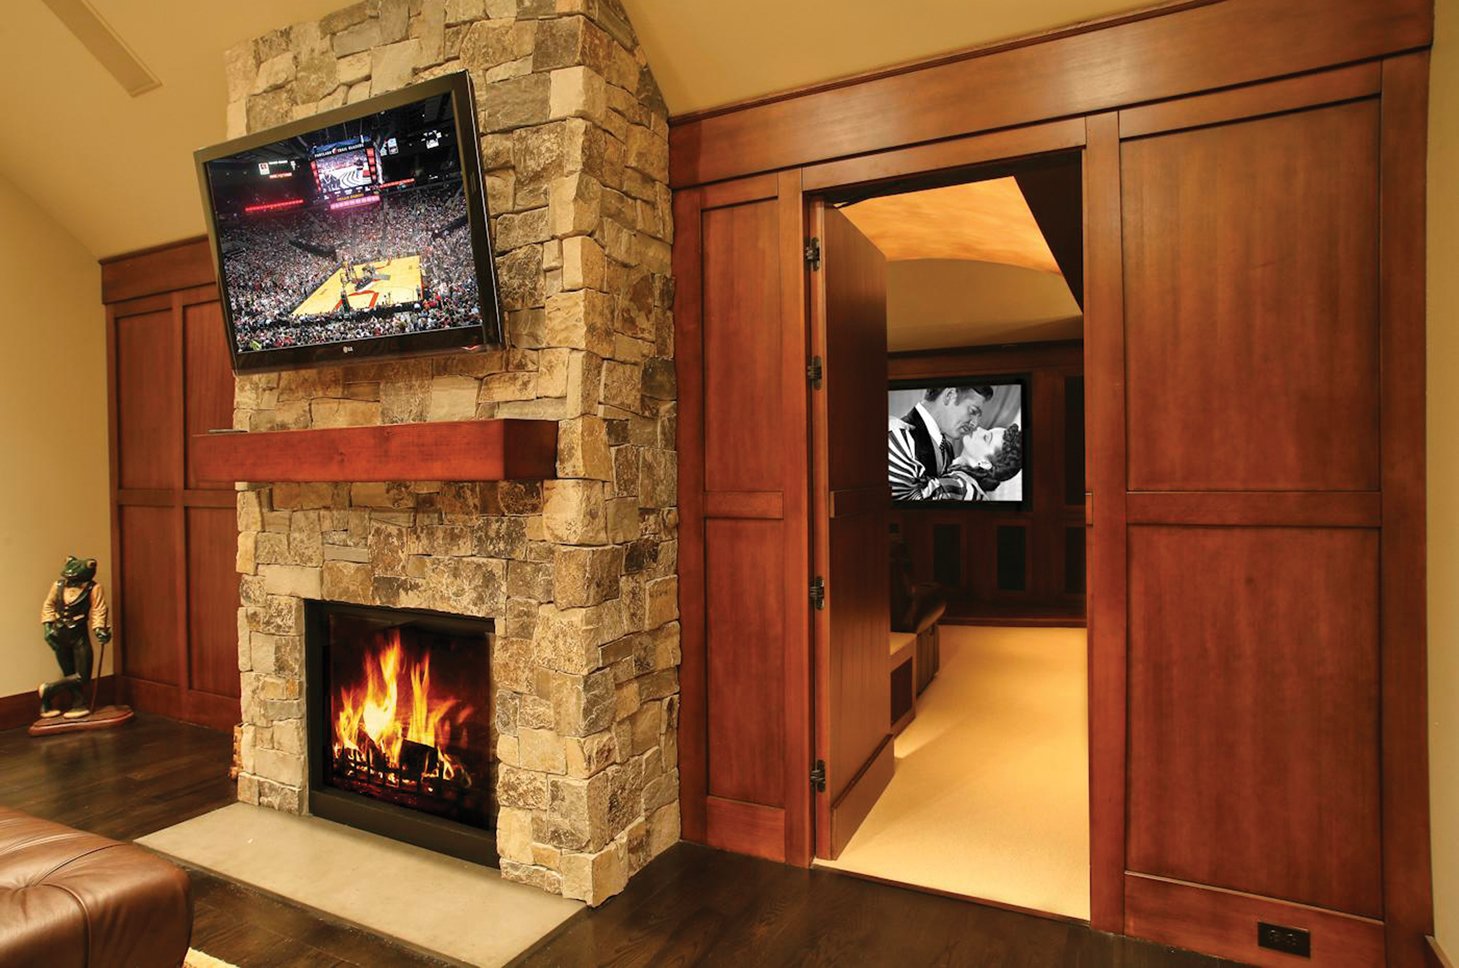
Consider the aesthetics, functionality, and overall theme of the room when selecting the type of secret door. Each option has its own advantages and can contribute to the desired effect and fit in with your overall architecture. Check out the example below where one of our customers created a hidden theater room.
Taking Accurate Measurements
To ensure a seamless and successful installation for your secret door, it’s essential to take accurate measurements of the doorway and the surrounding space. The precision of these measurements will directly affect the fit and functionality of your secret door. A good finish carpenter that can make precise cuts, angles and fits will be essential. Sloppy workmanship will reveal the location of your secret door in no time.
Begin by measuring the height and width of the doorway opening. Take measurements at multiple points to account for any variations. Note these measurements and use the largest values as a reference for constructing the door frame. Also, make sure to get straight pieces that aren’t warped, which will be much more difficult to work with.
Next, consider the space surrounding the doorway. Measure the distance between the doorway and any adjacent walls, furniture, or fixtures. This will help you determine if there is enough clearance for the secret door to open without obstruction. Consider if your secret door needs to open in or out and what type of hinges you need to accomplish that.
Additionally, measure the height and width of the hidden area behind the secret door. This will ensure that the space is sufficient for its intended purpose, whether it’s a small storage area for a home safe for example, or an entirely hidden room.
Accurate measurements are the foundation of a successful secret door installation. Take your time and double-check your measurements to avoid any costly mistakes or rework later. The old saying of measure twice and cut once really applies here. Otherwise, you will end up purchasing a lot of replacement materials.
By carefully considering the location, type, and accurate measurements, you can lay the groundwork for a well-designed and functional secret door. The next steps will involve gathering the necessary materials and tools to bring your hidden passage to life.
Gathering Materials and Tools
Before diving into the construction process, it’s important to gather all the necessary materials to ensure a smooth and efficient build. You could end up spending a lot of time running back and forth to the store grabbing “just one more thing” to finish the project and waste a lot of time. Here are the essential materials you’ll need for building a secret door:
- Lumber: Select high-quality lumber that is sturdy and durable. The type and quantity of lumber required will depend on the size and design of your secret door. Common choices include solid wood boards or plywood.
- Hinges: Choose heavy-duty hinges that can support the weight of the secret door, but even more importantly avoid butt hinges which have a pin sticking up on one side of the door. Consider concealed hinges such as SOSS Invisible Hinges for a more seamless and discreet appearance. If you need a hinge that can wrap around molding or trim without binding, consider the SOSS Wrap Around Hinge.
- Screws: Opt for screws that are suitable for the type of lumber you are using. Make sure to have a variety of sizes to accommodate different parts of the construction.
- Hidden Door Hardware: Depending on the type of secret door you’ve chosen, you may need specific hardware components such as a bookcase pivot mechanism, magnetic latches, or sliding door hardware.
- Finishing Materials: Plan for the finishing touches of your secret door. This may include paint or stain, trim pieces, and any additional decorative elements to match the overall aesthetic of the room. If you have other woodwork in the room, make sure you match the stain in a way that accounts for the natural aging that takes place on finished woodwork.
- Locking Mechanisms: Consider incorporating locking mechanisms to enhance the security of your secret door. Options include key locks, combination locks, or electronic access control systems. A cleverly hidden latch might do the trick as well.
- Disguise Materials: If you’re opting for a disguised secret door, gather the necessary materials for the chosen disguise. For example, if using a bookcase as a disguise, you’ll need shelves, books, and other bookcase accessories. When selecting books make sure to select books that go with other books in your home. Nothing screams fake faster than a bunch of books that don’t match anything else in the home.
Tools You’ll Need
Having the right tools on hand is essential to ensure an efficient and successful construction process. As with materials, having the right tool for the job will make your life a lot easier. Grabbing a wood chisel when you actually need a flat tip screwdriver will not only waste time, but won’t work as well and make you work harder to achieve the same results. Here are the primary tools you’ll need for building a secret door:
- Circular Saw: A circular saw is a versatile tool that will be used for cutting lumber to the appropriate dimensions.
- Drill: A power drill is essential for drilling holes, driving screws, and attaching hardware components.
- Router: Installing most types of concealed hinges will require that you use a router to cut out the mortise where the hinge will rest. If you use SOSS hinges, we provide a router guide you might find useful.
- Chisel: A chisel is useful for trimming and fine-tuning the fit of certain components during the construction process. Some people opt to skip a chisel and just use a router, but your specific project may still require it.
- Measuring Tape: Accurate measurements are critical, and a measuring tape will help you ensure precise dimensions.
- Level: A level is necessary to ensure that the secret door is installed straight and level.
- Screwdriver: Depending on the type of screws you’re using; you’ll need a screwdriver or a drill with a screwdriver bit for driving screws into place.
- Clamps: Clamps will assist in holding pieces together securely during assembly.
- Safety Equipment: Don’t forget to prioritize safety by wearing protective gear such as safety goggles, gloves, and a dust mask when working with tools and materials.
Make sure to have all the required materials and tools ready before you start building your secret door. This will help you work efficiently and avoid delays during the construction process. With everything in place, you’re ready to move on to the next phase: the construction process itself.
Construction Process
- Building the Frame: The first step in constructing your secret door is building a sturdy and well-fitting frame. Follow these steps to create a solid foundation for your secret door:
- Cut the Lumber: Use a circular saw to cut the lumber pieces according to the measurements obtained during the planning phase. Cut the vertical stiles, horizontal rails, and any additional framing components needed to create the door frame. Please note you may require a fine-toothed blade to get a clean finish cut without shredding or chipping trim.
- Assemble the Frame: Lay out the cut pieces on a flat surface and begin assembling the frame. Use clamps to hold the pieces together securely. Ensure that the corners are square, and the frame is level.
- Attach the Components: Use a drill and screws to attach the stiles and rails together, forming the door frame. Check for any gaps or unevenness and adjust as needed. If you are assembling fine or small pieces you might find wood glue works better than nails or screws which may split the wood.
- Reinforce the Frame: Strengthen the frame by adding additional support pieces or cross-braces, especially for larger secret doors. This will enhance the structural integrity and prevent any warping or sagging over time.
- Installing Hinges and Hardware: Once the frame is constructed, it’s time to install the hinges and other hardware components that will allow your secret door to open and close smoothly:
- Determine Hinge Placement: Mark the locations for the hinges on the frame and the corresponding location on the adjacent wall or door jamb. Ensure that the hinge placement aligns properly to allow the door to swing freely. Again, figure out if your door should swing in or out.
- Install the Hinges: Using concealed or invisible hinges will require that you use a router to cut out the space that holds the hinge. Unlike butt hinges which are simply screwed on with a pin on the opposite side of the door an invisible hinge is fully encased in the frame.
- Test the Hinge Operation: Open and close the secret door to check if the hinges are functioning smoothly. Make any necessary adjustments to ensure proper alignment and proper clearance of all pieces.
- Add Additional Hardware: Depending on the type of secret door you’ve chosen, you may need to install additional hardware components such as magnetic latches, bookcase pivot mechanisms, or sliding door hardware. You might even need to build the hardware you need and are unlikely to find very specialized pieces at a box store. If you need SOSS Invisible hinges, be sure to check our dealer page.
Concealing the Door
The next step involves concealing the secret door to maintain its hidden nature. The entire point of building a secret door is that nobody can locate it. This is where disguise comes into play. You need to yourself questions. What would a person expect to see in this space? What would look out of place? Try to think like a person looking for a secret door, what would you be looking for? Here are some basic ideas of disguise that might suit your design:
- Bookcase Disguise: If using a bookcase as a disguise, position the bookshelf adjacent to the secret door. Secure the bookshelf to the wall, ensuring it is level and stable. Adjust the shelves and arrange the books to create a seamless transition between the bookcase and the secret door. Keep in mind you might need to use trim and molding to achieve a fully hidden appearance. The use of trim might change the way your door opens or the type of hinge you need to use.
- Panel Disguise: For a panel disguise, attach the matching panel material to the secret door frame. Ensure a snug fit and conceal any visible seams with molding or trim. Paint or stain the panel to match the surrounding wall or decor for a cohesive appearance.
- Mirror Disguise: When using a mirror as a disguise, mount the mirror on the front surface of the secret door. Make sure the mirror is securely attached and aligned properly. Consider using a frame or trim to enhance the aesthetic appeal.
Finishing Touches
To complete your secret door project, focus on the finishing touches to ensure a polished and seamless integration. These finishing touches are what will make or break your project when building a secret door. The reason is if you have poor construction or fail to camouflage, the door will easily be found. The real secrets, no pun intended, of a secret door are good design, excellent craftsmanship and attention to detail.
- Sanding: Use sandpaper or a sanding block to smooth out any rough edges or surfaces on the secret door and disguise materials. Use fine-grit sandpaper or a sanding block to smooth any rough edges or surfaces on the door frame, panels, and disguise materials. Sand in the direction of the wood grain for an even finish. Consider using a sanding block instead of your hand, which may leave small grooves and imperfections due to uneven pressure from your fingers. This step will ensure a professional and refined finish.
- Painting or Staining: Apply a coat of paint or stain to the exposed surfaces of the secret door and the disguise materials. Opt for a finish that is durable and suitable for the material of your secret door and the desired aesthetic. Consider adding additional decorative elements, such as trim or molding, to enhance the visual appeal of your secret door. Paint or stain these elements to match the rest of the door, creating a cohesive and finished look.
- Camouflaging Techniques: Good camouflage is often the result of layers rather than a single approach. It starts with good design, followed by solid workmanship and using other elements in the room such as furniture, wall decorations, color pallets, etc. These work to create a layered camouflage effect. Use wallpaper, artwork, or decorative elements to create a cohesive look. Items that break up straight lines and force the eye to move in different directions will make the door more concealed and less likely to be discovered. Install concealed lighting fixtures above or around the secret door to create ambiance and draw attention away from its presence.
Adding Security Measures
Secrecy is the primary security measure for a secret door. If people don’t know it is there, they won’t try getting inside, however the even the best secret doors can be detected. That is where additional security measures come into play. To ensure the security of your secret door, incorporate appropriate locking mechanisms and security measures:
- Locking Mechanisms: Install a secure locking system that aligns with your desired level of security. This may include traditional key locks, combination locks, or electronic access control systems. If these locking mechanisms are as hidden as the door itself you will have additional security because even if someone suspects a door is there, but can’t open it they may give up and decide they were mistaken.
- Reinforce the Door Frame: Strengthen the door frame by adding additional screws or reinforcing plates to make it more resistant to forced entry. Remember the primary defense for the door is that nobody knows it is there, but IF it is discovered having long screws that go deep into the frame and extra screws will give you peace of mind with added security.
- Security System Integration: Consider integrating your secret door with an existing home security system for added peace of mind. Connect it to motion sensors or alarms to detect unauthorized access attempts.
Conclusion
Unveiling Your Hidden Masterpiece
Transforming a regular doorway into a secret door adds an element of intrigue and whimsy to any space. By following the steps outlined in this guide, you can create a hidden passage that will undoubtedly impress and captivate all who encounter it. So let your imagination run wild and embark on this exciting journey to unveil your hidden masterpiece.
FAQs (Frequently Asked Questions)
- Can I build a secret door in any type of doorway? Secret doors can be constructed in various types of doorways, including standard interior doors and larger openings. However, it’s important to consider the size and structural integrity of the doorway to ensure a successful installation.
- How long does it typically take to build a secret door? The time required to build a secret door can vary depending on factors such as complexity, materials used, and your level of experience. On average, it may take several days.